 San Diego Roof Repair
All roofs in San Diego need repair or replacement sooner or later. Regular maintenance such as cleaning eaves and drains can help prolong the life of your roof. Periodic roof inspections will help you spot developing problems before they cause costly damage to your home. The extent of the problem and age of the roof are key factors that can help you decide whether to do repairs or replace the roof.
Is your roof leaking? Don’t let that leak become a need for a new roof – call us today for your emergency roof repair needs. We’ll come out and inspect your roof, then let you know what you can expect in terms of time and cost.
We’re quick, efficient and we get the job done right the first time.
We specialize in locating and repairing the following types of roofs:
- Modified Bitumen (Torch Down) Roof Repair
- Tile Roof Repair
- Shingle Roof Repair
- Roof Drainage Systems
If you are experiencing roof leaks, call RC Roofing today.
Getting started is easy.
Call for a free, no hassle estimate (858) 274-8920
San Diego’s Tile Roofing Specialists
Tile roofing problems require “Tile Roofing Specialist’s” to offer and provide the proper solutions. As a leader in tile roofing with several excellent tile roofing crews on its field staff we are able to provide you with prompt, reliable service that you can rely on being done in a professional manner. Our warranty on your repair assures you of this.
More about Tile Roofs –
Tile roofing is beautiful but not waterproof. Tile roofing is a watershed and a decorative roof covering. The actual waterproofing is provided by the felt installed underneath the tile. Felt is organic and deteriorates over time, especially in the Southern California sun.
Sooner or later all tile roofs will undergo a tile R&R (Remove & Replace). In the mid to late 1980’s there was a glut of building in San Diego County. It is our experience that an abundance of substandard roofing felt imported from other countries was used as a tile roof underlayment for these roofs, both on commercial and residential applications.
As a result when a 12-15 year old tile roof starts to leak into the interior space it is usually a much bigger problem than is first thought. Often, it is a telltale sign that the felt is ruined. Delaying the complete replacement of the felt beneath the tile will only result in ongoing frustration for the occupants, not to mention the damage to the interior contents of the building.
Careful planning and inspection by a competent “tile roofing” contractor is the best answer. It is the only way to get your tile roof problem properly analyzed. If a new underlayment system is warranted, having the proper information prepared for you by a professional is of the utmost importance.
Getting started is easy.
Call us today (858)274-8920
for a free, no obligation estimate.
Shingled roofs are usually easy to repair. At the marked leak point, we look for damaged, curled, or missing shingles. At every place where two surfaces meet and around every chimney or vent, we look for breaks in the flashing or caulking or for gaps in the lines of roof cement.
If we can’t see any damage to the shingles or flashing in the leak area, we may need to access your attic to look for water stains or damage.
If we find evidence of a shingle problem, repairs are fairly simple. We can easily replace the curled, torn, rotten, or missing shingles.
Any shingle that lifts right off the roof with no effort is rotten and should be replaced.
If we locate large area of rotten shingles, you may need a whole new roof.
Below you will find a VERY detailed article about shingle roofing failure points. We hope it answers any questions you might have, if not give us a call, we’d be glad to answer them for you.
Careful planning and inspection by a competent Roofing Contractor is the best answer. It is the only way to get your roof problem properly analyzed. If a new Roofing System is warranted, having the proper information prepared for you by a professional is of the utmost importance.
Getting started is easy.
Call us today (858)274-8920
for a free, no obligation estimate.
Roof Failure Factors
John Cranor
Why do some asphalt composite shingled roofs age faster than others, and what problems require attention to forestall failure?
“How long will the roof last?” That can be a tough question when it’s being asked about an asphalt composite shingle roof. In the first part of this series, we covered how shingles, sheathing, flashing and other materials should be installed, as well as common installation mistakes. Information about how to evaluate the condition of the shingles and the roof as a whole was included. All useful information, but when it comes to potential roof life, there are important additional factors that need to be considered.
Determining how old a roof is not the best way to estimate how long it will last. There are aging factors to be considered, and the more that are present, the more likely it is the roof will age quickly. There are also problems that need to be addressed to prevent rapid failure.
Basic factors that affect the potential life of a roof
Design – Design complexity plays a role in roof failures. In brief, the more penetrations, valleys, changes in direction or instances of shingles meeting different materials, such as occurs on a built up roof, the more likely there will be premature failures or leaks. You have to shake your head at some roof designs. I often wonder on certain designs if any consideration was given to potential roof drainage problems.
Roof’s Pitch – Typically, the steeper a roof is the longer it will last, and the less likely it will leak. In general, water runs off a steep roof quickly, and does not back up during high winds. All things equal, a steep roof will dry faster than its shallow counterpart. All of these factors tend to extend the life of a steep roof, or even the steep slopes on a house with varied slopes.
The preferred slope for shingles is 4/12 or greater. Most shingles, however, can be installed on slopes as shallow as 2/12 with waterproof underlayment. Occasionally, I’ve seen a double layer of asphalt felt used (sometimes roof cemented together), or some other single-ply material under shingles on shallow slopes as an attempt to compensate for a shallow slope.
Physical damage
Wind, hail, tree limb and scuff damage is common on asphalt composition shingles.
• The rip of the wind can be a threat to a shingle roof. Proper nailing techniques, the sealant strip and the shingle type all play a role in defending against wind damage.
• Hail damage is often an insurance issue; therefore it should be addressed immediately after damage occurs. Hail damage sometimes appears as little spots lacking most or all of the granules. But, depending on the shingle condition and the severity of the storm, hail can practically destroy a roof.
• Limb damage is something that should have been addressed before it occurred by pruning the branches of trees that pose a threat to the roof. Tree limbs that are too close not only can damage shingles, they also shed debris on the roof – slowing the drying process, which can affect shingle life.
• Scuffs are usually from roof walking on hot days.
Physical damage or the possibility of damage should be reported. Even a small piece of broken shingle can leak!
Sun Exposure – Sometimes there is a marked difference between the deterioration of the shingles on two different sides of the house. It can be because the shingles on one side are older than on the other side; but it can also be because one slope faces south and the other faces north. Typically southern exposures age faster than other exposures due to ultra violet light from the sun. Shingle colors may also influence the extent of this difference, with darker colored shingles aging faster than lighter colors on a southern slope.
Because of the hotter days and more hours of sunlight in the south, I suspect these differences occur more often in southern states than in northern ones. The same factors may also affect roof over shingles.
Roof Over – Most shingle manufacturers do not prohibit shingle roof over; nor does it alone affect the limited warranty. Some experts say it can reduce shingle life as much as one-third. I believe the effect on shingle life is greater in the southern states and when an attic is not properly vented. As home inspectors, it is wise to adjust the remaining life estimate accordingly. Roofers have been known to insist on improving ventilation on re-roofs, such as by adding ridge vents or a fan.
Even though some shingle manufacturers do not prohibit second layers over dimensional shingles, I don’t know of any roofers who will install new shingles over irregular dimensional ones.
Problem areas
Almost every roof has at least one plumbing pipe, flashing and a change in plane. Many have skylights. And if there’s a problem, it will usually involve one or more of these four elements.
1) Plumbing Pipe Flashing
Also known as plumbing or pipe collars, plumbing flashing is notorious for failures, improper installation and amateur workmanship. When installed correctly, at least one-half the flange is covered with shingles, and the collar should appear similar to the illustration. (See figure 3).
Figure 3
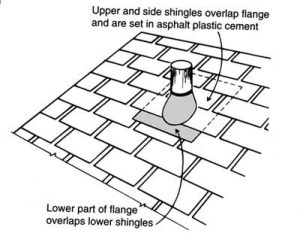
There may be slight differences, depending on how the shingles are falling. Some shingle manufacturers recommend using roof cement under metal flanges. In my experience, most roofers do not use it. Using roof cement on plastic plumbing collars is prohibited. Roof cement will cause rubber or plastic to deteriorate, and should not be used on either. There should be no roof cement or caulk around the base of the boot at the shingles. Sealant in this area will often trap water and cause a back up of water under the shingles, and it is a sign of amateur workmanship. Sometimes an exposed flange is caulked to the shingles, but this should not be necessary if it is installed correctly. Its rubber seal can split and leak as the flange ages. The flange should be flush with roof – often it has a lift, making it vulnerable to wind-driven rain.
2) Flashing
The roof is most vulnerable to leaks where there is flashing. Almost anyone can nail a shingle, but installing flashing is where you separate novice roofers from the pros. Flashing has to be correct or at least close to correct or it will leak. If the metal flashing is going to be effective, it must be a corrosive-resistant metal and accommodate roof, chimney, wall and structural movements due to settlement, expansion and contraction.
• Chimney flashing – Chimneys move and need to have a two-part flashing system – a base (step) flashing and a cap (counter) flashing. The presence of only the step flashing indicates poor workmanship. A good flashing detail will have the step flashing secured to the deck and the counter flashing secured to the chimney (see figure 4).
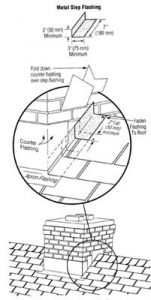
The counter overlaps the step, forming a moveable joint. When movement occurs, the watertight seal remains intact. If there is only step flashing, it will likely pull or split open. Be sure flashing along brick is sealed.
Although step flashing is the most common (and preferred) used on chimneys, you will also see channel flashing. Channel flashing is long lengths of pre-bent metal with a “V” crimp diverter, which is often the cause of a slight lift in the shingles along sidewalls and chimneys.
• Topside flashing – is commonly called the backer or header flashing. (See figure 5)
Figure 5
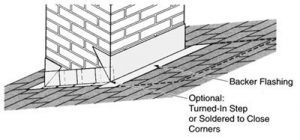
The backer flashing should extend up on the vertical part a minimum of 6″ and up under the shingles at least 12″. The first course of shingles on the upper side of the chimney should be trimmed back a minimum of 2″. The reason the shingles are cut back is to allow proper water drainage and to promote a natural cleaning of debris that would otherwise collect at the top side of the chimney.
Shingle manufactures recommend the use of crickets (or saddles) on chimneys wider than 24″ (some say 30″). Crickets divert the water to prevent ponding and ice and snow build-up behind the chimney, which could cause a backup.
Often old flashing can be re-used (depending on condition) without failure, but it is wise to inspect reused flashing carefully and to warn the customer of the potential for failure. Copper can develop pinholes, but typically outlasts an asphalt shingle roof. The downside is that it may have been reused for several roof installations. Heavy roof cement around flashing indicates previous leaking. A roof cement patch will typically last three to four years. Remember, roof cement is not a substitute for flashing.
• Loose flashing or cracked/missing caulk – Sidewall flashing installed on the outside of siding is a short cut, and it requires close monitoring. Sidewall masonry should have a two part-flashing as described in the section on chimneys. The bottom of the flashing must cover the top of the shingles, even on roof over jobs.
• Flashing at vertical “front” walls – (See figure 6
)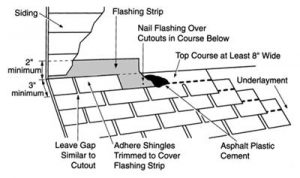
The flashing should be nailed every 12″ and be lapped 6″, without a nail in the lap to allow for some movement. Although some shingle manufacturers recommend the use of roof cement under the flashing, in my experience most roofers do not do this. Some roofers will cement shingle tabs over the exposed flash-ing at vertical front walls, but this serves only as a cosmetic feature.
• Valley flashing – An area known for poor workmanship. Valleys should be no longer than 10′, to avoid buckling with expansion and contraction. Valley flashing lengths should be lapped a minimum of 6″, but this is something that is difficult to determine during an inspection. The cut out in the open valley should be 6″ wide or 3″ on each side of the centerline. Some manufacturers prefer a tapered cut, usually 4″ at the top and a taper out at a rate of 1″ for every 8′, meaning a 16-foot valley can have a 4″ opening at the top and an 6″ opening on the bottom. A tapered valley may appear unusual, but it is typically less likely to hang up ice and/or leaves, which can cause a dam. A uniform open valley is the most common type. Valley flashing must be “blind nailed” – you should not see any nails. There are also standing seam valleys – the valley has an upstand in the center, which is a premium flashing detail. The purpose of the upstand is to prevent water from running down one slope and running up under the shingles on the other. In my experience most roofers leave valley shingles loose, even though some shingle manufacturers recommend applying roof cement under them. Roof cement in or around valleys indicates previous leaking. Check rusty valleys for holes and recommend paint maintenance.
There is also a potential for leaking if the valley flashing does not overhang the fascia board. Many areas of flashing details are not visible, therefore are beyond the scope of a home inspection. But even when details can not be checked, it helps to know why the leak potential is so high with flashing, and why roof cement can be the wrong solution.
The use of roof cement certainly has its place, but using it in the wrong places can have the reverse effect of what the installer is trying to accomplish. Careless use along valleys, flashing, or plumbing vents can (in some instances) dam and/or trap water, causing water to back up under shingles or flashing, compromising their water shedding abilities. Many roofers never use roof cement on shingle roofs, but others do. Maybe in “Ice Dam Country” it is more frequently used under flashing, than elsewhere. In all climates, exposed roofing cement deteriorates quickly, even though it typically wears well when covered.
3) Changes in planes
Where a roof surface changes plains is a trouble spot. There may be flashing or not, depending on the how extreme the change is and the roofer. Check these areas closely, if possible from the attic to look for stains.
4) Skylights
Often troublesome (even on steep roofs), skylights usually develop problems due to poor (unskilled) installation. Also because of the design it can be difficult to create and maintain a weather tight seal with a low quality skylight. Skylights that appear like bubbles and are flush mounted to the roof should immediately become a red flag due to their notorious reputation for leaking. The ones that sit on a manufactured curb are more reliable, of course depending on whether or not they have the proper flashing installed. Cracks and/or broken glass are also common. Clients often want to know if the skylight can be cleaned. If it’s plastic, probably not; maybe glass with some elbow grease. Roofing cement around means it would be wise to check closely for signs of leaking. At a minimum, report the presence of roof cement, warn that it may have leaked, and may leak again.
Red flags
Some of the following problems described here are more serious than others, nevertheless all require equal attention, and all need to be fixed.
• Raised shingles – Under-driven nails, backed-up nails and less than adequate return on flashing details are common reasons for shingle lift. Backed-up or under-driven nails are common, but should be corrected because over time the nail may penetrate the shingle and/or wind is more likely to rip off the raised shingle. “V” crimped flashing will also cause a slight rise in shingles. The purpose of crimp is to channel the water, preventing it from getting under the shingles. For the most part, shingles should be flush. Raised shingles are vulnerable to wind damage, and are more likely to allow wind-driven rain to breach the surface.
• Buckled shingles – The cause of buckles or wrinkles is sheathing movement, caused by improper space allowances or nailing of sheathing, poor attic ventilation, or structural movement. Regardless of the cause, buckles should be reported with a recommendation to correct.
• Exposed nails – Exposed nail heads should be limited to a few at the ridge caps and on overlapping flashing. None should be visible on valley flashing, or between the cutouts on the shingles. Exposed nails in acceptable locations should have a sealant. Caulk or roofing cement used on nail heads on the open roof surface is considered a temporary fix, but common sense dictates if the shingles are nearing the end of their normal life. I would still report patches with minimum life remaining.
• The leak – A roof can look good, but leak. Or, it can look bad, but not leak. Also, roofs can be frustrating because leaks don’t always come straight through. Often water will penetrate at one place, run along felt paper until it finds an opening; turn and run along the plywood until it finds another opening. The leak is not necessarily above a stain. What looks like a roof leak can be a gutter or siding issue.
• Patches – A patch is not always a problem, but it usually indicates a previous leak or damage. Patches warrant a close look to determine there is a proper tie in with sur rounding shingles. If surrounding shingles are old and brittle, a good tie in is hard to accomplish. It’s wise to inform clients about patches and to warn them that patches sometimes will fail and leak, especially on older roofs.
• Cracks – Cracks completely through the shingle material or through the reinforcement are usually referred to as thermal splitting or tearing. This type of cracking threatens the waterproof integrity of the roof. It is a defect that needs to be addressed. Surface cracking, which does not go through the shingle, is part of the aging process. Severe surface cracking indicates advanced age.
• Bald spots – Bald spots are sections of exposed asphalt or scattered, black bare sections with fiberglass mat showing through on a roof that otherwise looks to be in good shape. Washing the roof with a pressure washer, which removes the granules, is one cause of bald spots. Depending on age, the spots can indicate the roof is at the end of its useful life. Whatever the cause, bald spots are a problem, and should be reported.
• Blisters – According to shingle manufacturers, small blisters are part of the normal aging process that is often accelerated by lack of proper ventilation. Other authorities say blisters are the result of manufacturers’ defects in the material. Either way, I believe blisters shorten shingle life. When you see blisters, check attic ventilation. I would also inform a client of the possibility of premature failure. Open blisters, with asphalt exposed, are most definitely an indication of minimum life remaining.
• Holes – Watch for small holes. I often find unexplained holes. Probable causes: bullets, arrows, falling limbs, Christmas light installation.
Worn out – It usually easy to identify a worn out shingle, sometimes from your vehicle! Crumbling, cracked up, cupping, clawing, excessive loss of granules are all signs of advanced deterioration. Also the cutouts often widen as the shingle ages, because the shingle is drying out and shrinking.
Always look closely at the shingle under the cutout. The aging process may be accelerated in this area because there is only one layer and it is often a darker color. Deterioration under the cutouts is a sure sign of advanced deterioration, and this area is often the first to begin leaking.
If you have any questions please call us… (858) 274-8920
Roof Drains
The roof drainage system is clearly one of the most under-rated components on the average flat roof. Next to roof flashings, they are also the most vulnerable. Leaks that develop at drain locations can be catastrophic for the roof system.
One of the cardinal rules of good roof design is to provide slope for rapid, dependable drainage. What is often overlooked, however, is that one roof drain may be responsible for removing the water off 10,000 square feet of roof area; even more if the roof was not properly designed in the first place. So if a leak develops at a drain location due to a defective component on an old drain, it’s likely to dump a significant amount of water into the building.

Retrofit drains are an option during a repair or re-roof. The primary advantage of using a retrofit roof drain is that it gives us control over the roof rather than waiting for a plumber to run new pipes. While repairing or reroofing we install the retrofit system and ensures it’s watertight before we move on to another area of the roof.
A good retrofit drainage system should include a metal flange, strainer, clamping ring (if required), and outlet pipe. The clamping ring creates a compressive seal on single-ply membranes. The roofing material is brought in over the horizontal flange, and a series of studs receive the clamping ring and hardware. After the compressive seal is formed, if water backs up out of the drain, it won’t be able to flow in under the roofing membrane.
